Showing posts with label Halloween. Show all posts

Monday, October 24, 2011

Metallic Pumpkins

I love the look of metallic.  I went to the store the other week to get spray paint and came across some silver and gold metallic paint. I thought it would be fun to paint my pumpkins metallic.  It took a matter of minutes and this was the outcome.................

 I decided to put them in my kitchen since I did not have any decorations there. I like how they turned out! I'm sure we'll be seeing this paint again!

Melissa

Pin It

Sunday, October 16, 2011

Halloween Wreath

For some reason one of my obsessions lately has been wreaths. I don't know why but I love what they do to a home. They are so welcoming and fun. You can do so many different things with them! This last one I made was so easy and I love how it turned out.

Here is what you need:
foam ring: whatever size you want your wreath to be
tulle: I like to get the ones on a roll, makes it easier to cut. If you get the ones on a roll you will need 2 rolls depending on how full you want it. I chose black to make it be more Halloweeny =)
paint
ribbon
a couple pins

Step 1: Paint ring whatever color tulle you will be using

Step 2: Cut tulle into 22inch strips (you can make them longer or shorter if you'd like)

Step 3: fold tulle in half, around the ring pull the ends of the tulle through the middle. I know this picture is a little hard to see but it's the best I could do!!
Continue this step until the entire ring is covered and you have made your wreath as full as you'd like

Step 4: Cut a long strip of ribbon. Put it through the wreath at the top and pin it in place. Tie the ribbon about 3 inches from the top then tie it again at the very top. This will leave a ring in the ribbon so you can hang it nicely.

Step 5: Use your ribbon to make a basic bow. I like to use the wired ribbon for this since it is more flexible and will do what I want!

Step 6. Pin bow on top of other ribbon on the front of the wreath.

And here you have it!

You can use whatever color tulle and ribbon and make it for any Holiday or just because =) I do like my Halloween stuff spooky but I think I like fancy more!!

Melissa

Pin It

Friday, October 14, 2011

caramel apple chocolate covered cake pops!! oh yeah!!!

hello again!!! welcome back!! ever since i heard of cake pops, i have been all over that situation.  they are so fun and easy to make. they are a bit time consuming,so i like to read a book whilst making them or cleaning, i guess would be good too.  i had an epiphany while drifting to sleep one night...caramel apple cake pops, covered in chocolate and sprinkles....oh yeah.  i love regular caramel apples, but i find them somewhat bothersome to eat.  this is my version of regular caramel apples:  1 white cake mix, 2 apples, apple flavoring (hobby lobby, joanns, michaels), 1 can frosting, 1 pkg individually wrapped caramels, dipping chocolate or regular chocolate chips and add a bit of veg. oil, either lollipop sticks or some other type of stick.  i used skewer sticks because my walmart was out of lollipop sticks and the corn skewers were 50 for $1.  so, here we go!
peel and core apples.  slice them then stick them in a food processor.  make cake according to directions on pkg, but add your apples and the apple flavoring. (i added both! it comes in a pkg of 2)  i wanted them to be really apple-y.  bake according to pkg.  let cool.  now crumble.  this is a good spot to let your kids join in!  make sure they wash their hands (don't take their word for it, mine always say they did, but their hands and fingernails tell a different story)
now that the cake is all crumbled, i do this in the same pan as it was baked in, btw, it's time to add the frosting and melted caramel. i used a whole pkg of caramels.  for this recipe, please do not add all the frosting, if you wanted, you could even omit the frosting and just add the melted caramel to it!! now the pictures will tell the rest of the story...


 so, after dipping the cake pop in chocolate, let it drip for a minute, otherwise you will have a big chocolaty mess.  apply sprinkles by shaking them on, not dipping.  then, place it upright, into a cardboard cake pop stabbing apparatus that will hold them up. let them set for a minute or two, or whenever you are finished stabbing them all in the apparatus, then put them in the fridge.  they are best cold. (in my opinion)
                                           then you are done and it is time to consume them :)


they are not quite the same as caramel apples, but they are sure tasty!! and the caramel is just delightful!!
my boys helped me with these (and the above picture) and though, at times it is frustrating that they don't do it exactly how i tell them (as shown in the above picture), i love to see them really try hard, 'cause they want to eat them so badly!!  they LOVED the cake pop covered in candy corns!!
if i am making these for someone i like to individually wrap them. you can get little bags and ties in the cake section of walmart, joanns, hobby lobby, or michaels. don't for get your coupon!!
enjoy!!
                                                                      cherisse

Pin It

Wednesday, October 12, 2011

Pirate Cupcakes

This past weekend my sister asked me to make pirate cupcakes for her friend's birthday
For those of you who know me know I LOVE CUPCAKES
I typically like to make fancy cupcakes with swirly frosting and sprinkles so the pirates were going to be a challenge for me.
Here is how they turned out

I LOVED how they turned out.
And they were so much fun to make.
The cupcakes are chocolate cake with cream filling.
 Basically a homemade hostess cupcake
You can find the recipe HERE

The top is a layer of ganache then fondant made to look like pirates and skull and bones


I think these cupcakes go well with the Halloween season don't you think?

Melissa


Pin It

Monday, October 10, 2011

Freezer paper halloween shirts and candy totes!!

i have more fun and very inexpensive crafts to do with your kids!! yay!!  this does not have to be limited to halloween, we also did some of these at easter time, and at the fourth of july and they were super cute!  these are diy shirts using freezer paper, paint, an iron, an image from the internet and maybe some spooktacular imagination!!  first of all, i googled free fonts, the other day (i will divulge why at a later date closer to christmas!!  you WILLwant to stay tuned!) anyway, i came upon the site california fonts.  they have some seriously wonderful FREE fonts.  i found some awesome halloween fonts that were actually pictures, so using their fonts, my boys chose a picture they wanted for a halloween shirt.  carson chose a very cute mummy, and cody chose a bat. the shirts we used were just random blank shirts that were in their drawers.  walmart has blank shirts for super cheap, fyi.  anyway, i traced the image on my computer screen (again, no working printer) onto my freezer paper on the paper side, not the smooth plastic side.  i carefully cut it out, and used the negative image (as shown below) and ironed it on, being sure i got the edges of the paper. 
here is an example of the image already ironed on.  the eyes, hair and teeth are ironed on too because i was leaving those the color of the fabric underneath.  i could've painted the whole thing green, then paint over it, but i find the freezer paper will sometimes take up part of what i've painted under it.  make sure you've put a piece of cardboard between the front and back of your shirt, or the acrylic paint might bleed through.  now, you are ready to paint!!


carson was painting a white mummy onto a black shirt, so he had to paint thick.  i think we did a few coats.  let dry...not long, acrylic paint dries really quickly!!  i used a blow dryer on the hottest setting to dry the surface!  cody did a black bat on a white shirt and it was the same for his too, lots of coats so it was a consistent black.  it may feel crusty and inflexible at first, but a couple times through the wash and it will soften up significantly!


the finishing touches...the red eyes on the bat i used the end of a small paint brush dipped in red paint.  the lines for the mummy and the eyes, and the mouth i used a sharpie!  it does not come off in the wash! i just copied the picture! and i messed up a little and just painted over it! yay!  they love their shirts and they are both being what their shirts are depicting!! i'm really excited!!!


       so last year we had some really cute halloween candy collecting buckets that were supposed to be their "permanent" candy collecting buckets....yeah, with boys, nothing is permanent (unless it's marker on the carpet).  so, this year, we made some!  so fun!!  we did it the same way we made the shirts.  the boys got to pick out two pictures they liked that were halloweeny. (carson and i didn't really like any of the frankenstein pictures so we collaborated, each came up with a few and decided which features we like on which franks...)
i also made the tote bags myself from some excess fabric from another project (coming in december or late november).  it is drop cloth canvas from lowe's and super cheap. $5 to be exact (may vary where you live).  i just cut them out and sewed 'em up, stuck some old ribbon on them that was extra (fyi, almost everything i have is left over from another project).  then we got to stenciling with our freezer paper!! i absolutely loved the way they turned out!!  they have pre-made tote bags at michaels, joanns and hobby lobby. make sure you have a coupon before venturing out!


these two are back to back on the same bag
i love this one!!  it's my favorite!! 
i got the letter stencils in the address numbers isle at lowe's.  you have to keep a sharp eye!! i almost missed them!  $3.

as for dressing up, as of right now it goes as follows:
carson: mummy (i finally talked him into it!!)
cody: bat (he wanted to be this last year, i made a costume, then at the last minute changed his mind)
me: the wicked witch of the west (i will have ruby slippers though, for fun)
jonathan: a pumpkin head, maybe (he said that last year and the year before)

i think i will post how i make the costumes here.  again, i have most everything...
with that, i will leave you, so you can make your own super easy shirts or totes, i will be watching harry potter with my kids...and very reluctantly cleaning up my mess....maybe.
cherisse

p.s. coming soon are some fall-flavored cake pops!! i can't wait to share these!

umm...this has nothing to do with this post, but a fantastic read in the spirit of halloween, is the forest of hands and teeth.  creepy and very good.enjoy!

Pin It

Thursday, October 6, 2011

halloween mantel

 it is officially the month of halloween!!  i absolutely love halloween for a few reasons...1. i first started reading harry potter in the month of halloween, with mysterious cloudy skies which makes it all the better. (warning: i am a crazy harry potter fan) 2. the treats are amazing. 3. you get to dress up as whatever you can dream up!! last year i was mother nature and little kids wanted to take pictures with me!! was that awesome? yes...and yes, i still dress up. 4. candy galore. 5. spooky decorations, which incidentally are harry potter themed or other books/movies from my childhood that i absolutely love. 6. scary movies. yes!! i can watch ghost hunters and not feel silly, cause it's halloween month.  ok. that was more like several reasons!! anyway, today, i want to share with you my halloween mantel that my boys helped me with.  i did not spend a dime.  everything i used on my mantel was random stuff i had around the house and  repurposed for this halloweeny purpose. here we go!!


here is my awesomely spooky spell book (hocus pocus)/wand (holly, eleven inches, phoenix feather core).  this is what i did for this look:  i got the biggest book i own (sorry jane austen, but i do have two more books that are identical to this one, not to mention the one in my kindle).  so, i ripped the pages on the sides to get a worn look. next, i dipped the whole book into a sink full of water. i separated the pages a bit to get them rumply looking.  i took it outside on our wall and opened it up to where i wanted, (pride and prejudice) took a wet sponge and some brown paint and rubbed the sides and top and bottom.  i also rubbed some on the open pages.  green came next, i splattered it so it looked like gross potion or something.  glitter was the last.  just a sprinkle.  i left the book outside for a while and when it was almost dry, i ruffled up the pages a little so it looked as if i had turned those pages a million times to do my evil deeds.  the wand is just a stick carson found outside.  easy. took about 20 minutes tops.  i put it on the mantel when it was still wet.

 this is just your run of the mill home-made apothecary jar.  mine is a pickle jar filled with candy corns and decorated with some leftover scrapbook paper and paper pumpkins.
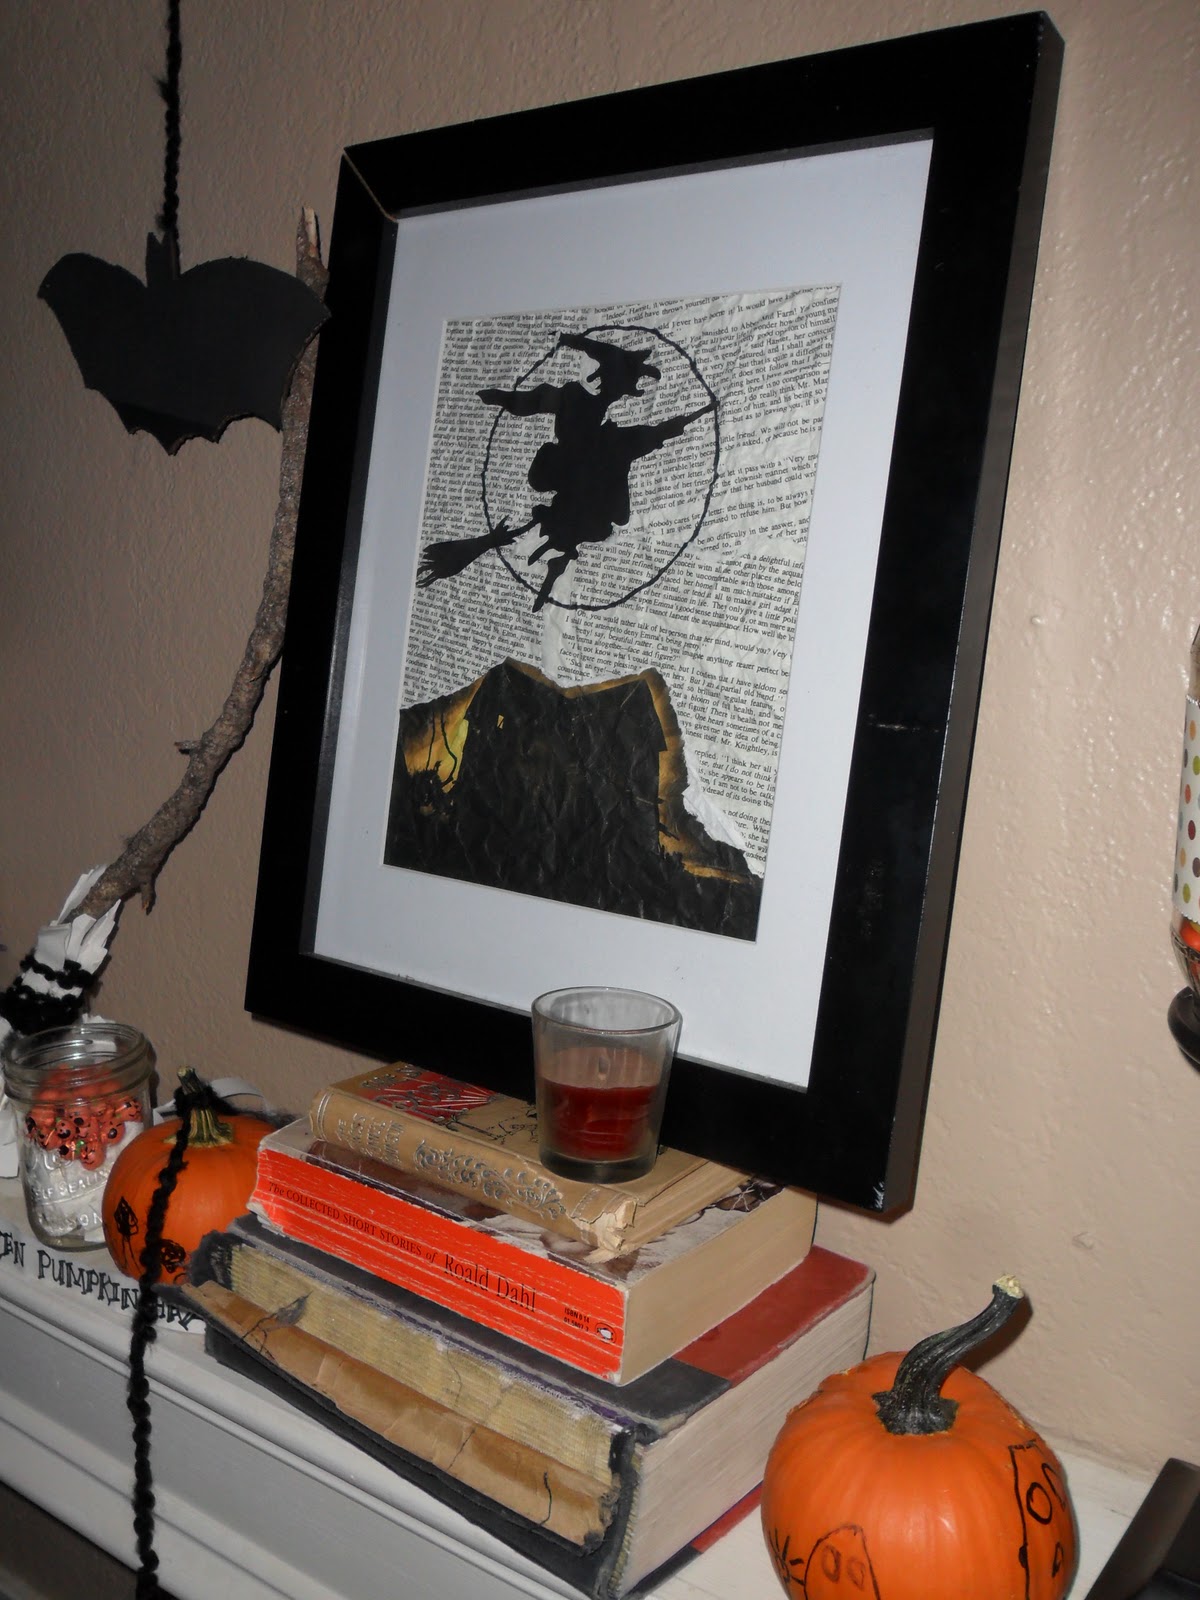
 this was so fun/easy!! i took my same book i used for my spell book and tore 4 pages out of it.  ripped them a little and wrinkled them so they looked old.  i found a picture of a witch flying on her broom in front of the moon online and traced it onto a lined paper (we have no printer and no white paper :) )  i cut it out and sprayed it black.  then i glued it to the book paper.  i used a halloween scrapbook page and ripped the haunted house out of it.  put it in a frame i found in one of our closets and abracadabra!! halloween fun!  the books it is on are harry potter 4, short stories of roald dahl, and the swiss family robinson.  they were the most used and torn up.  the pumpkins are drawn on with marker by my two boys.  random candle
 more hp books and one called "past secrets"...i think that one is melissa's that i never returned.  woops.  on top of the hp books is a pickle jar filled to the brim with deadly poison!!! muahahahaha!!!  ok so it's just water and green food coloring.  "the powder of life" is what dorothy uses to bring the gump to life from the wonderful movie "return to oz".  yes, video store man, "that one weird movie".  i love it.  the firebolt (aka broom)  is made from, wait for it, a stick, found by carson (we have a collection by our front door) and the pages i ripped from the sides of the spell book, bound with black yarn. random candle.
next in line to the broom, we have our shrunken pumpkin heads. here's how to do those.


have your child gather acorns from around the yard.  peel off the "hats"  that's what we call them.  put them in a bowl, put your orange paint in and roll them around.  put them on a piece of paper or cardboard to dry.
when dry, put faces on with a sharpie. then dip the tips of them in the lid of green acrylic paint. done!  some were really small and super cute!
the bats are made from cardboard boxes that we were going to throw out.  made a basic bat shape and cut, and painted them.  we hung them up with tape.
(not shown here:  awesome yarn spider web slinging down from the mantel to the brick, made by carson and cody, cardboard hatchet, cardboard knife, also made my carson)
this was seriously fun, awesomely cheap, decorating.  it took us about 2 hours for everything. it was a really fun way to create with my creative boys and spend some quality time with them! we have yet to decide what we're going to be for halloween, but it will be great!!  all this witch stuff makes me want to be a witch this year!! happy halloweening!!
cherisse

Pin It

Tuesday, October 4, 2011

Halloween Candle Decor

I have been trying to get better at decorating my house for Halloween. 
So I look for anything I can to turn into a something Halloweeny!

A few weeks ago I decided to paints some old candle holders teal. 
I am IN LOVE with the color.

Then I got the idea to Halloween them up and put orangish cream candles on them and add some ribbon. 
(ribbon makes everything look better!)
And Viola!
I now have Halloween decor that didn't cost me a dime, was super easy and I can change the ribbon and candles when Halloween is over!

Melissa

Pin It