Sunday, December 18, 2011

No Sew Tree Skirt

 I was searching pinterest a while back and was so excited when I found a super cute no sew tree skirt!
Then while out with my mom she mentioned she wanted to get my sister one.
I told her I would make one 
half way through I regretting that. 
I wish I would have made it for MYSELF it is so incredible cute!

Here is what it looks like.
Didn't it turn out so cute???

I will be making myself one next year!

HERE is where I got the instructions!
Try is out, you'll love it!

Monday, December 5, 2011

Birthday Party Fun

I started planning Stella's birthday MONTHS ago.
I love doing fancy creative things for parties.
Sadly, I did not have the energy to do everything I wanted to do =(
But I was able to do a few of the things I wanted to.

First, I made a fun little banner:

I put balloons on a basket to make it look like a hot air balloon. I saw a picture of this forever ago and loved the idea. I think it turned out pretty cute. 
Too bad I didn't get a picture that actually turned out good!!! Boo!

I asked family to make different types of cookies and had a cookie bar! 

Finally, I made Stella's cake. It did not turn out exactly how I planned since I had never done it before but I'm happy with how it turned out.


We had so much fun celebrating her 2nd birthday with family and friends. She was spoiled rotten! I had a lot of fun planning and preparing to make the day special for her even if she didn't notice =)

Now I will start planning next year's party!!!

Melissa

Saturday, December 3, 2011

Stella turned 2

I can't believe my baby is TWO already.
 Tomorrow I will be posting all the fun cute things we did for Stella's birthday.
I am way too exhausted to post it today.
I'm excited to share the crafty things I did for her birthday party.
Tune in tomorrow!

Melissa


Thursday, December 1, 2011

i just discovered the best thing!!

okay, so i'm probably the only one who didn't know this, but i'll tell anyway!!  you can get a letter from santa post marked from the north pole!! here is what you do: you get said letter from santa, address it to your child and put postage on it. then, you put that envelope into a bigger envelope and address it to the following:
north pole chrismas cancellation
325 s. santa claus lane
north pole, ak
99705-9998

i spoke with a woman at the post office and she said to be sure to mail them to the post office before december 12th!! you still have time!!!  now, do you want to see what my kids will be getting?

isn't that fun!!  sooo easy!!!  if you want the template i used, please email me at fancifulshenanigans(at)gmail(dot)com please put nice list template in the subject line!!  have fun!! i hope you get on the nice list!!

cherisse

Saturday, November 26, 2011

Frozen Hot Chocolate

I decided to participate in Black Friday this year. So today I am T.I.R.E.D!! But I wanted to share a yummy recipe with you.

I have a new love.
It's name is not just hot chocolate
but FROZEN hot chocolate.

Yes I know it is cold outside but seriously this is the best frozen drink ever. 
You HAVE to try it!

I originally got the recipe HERE but after trying it I changed it a little and made it much more simple!

Here is what you need and what I did:
3T granulated sugar
2 packages of hot chocolate mix
2T unsalted butter
12oz can evaporated milk
Ice
Whipped Cream

Combine sugar, butter and hot chocolate mixes in a double boiler. 
Heat until it's paste-like then add 1/2 of the evaporated milk
Cool to room temperature
Combine chocolate mixture, the rest of the evaporated milk, and ice in a blender.
Pour into a cup and top with whipped cream!

Oh So Yummy!!

The next time I make this I am going to skip the heating part and just melt the butter and add to everything and blend with ice. We'll see how that turns out!

Oh and I promise to try to remember to start taking pictures of my recipes I make!! I always forget!!!


Melissa

Thursday, November 24, 2011

i can't believe i forgot!!

i totally forgot to post yesterday!!! aaaah!!  but i am here now, and i have such a fun thing to post!!  mini pumpkin pies!! i made these for carson's 1st grade class.  they were a HUGE hit!! i saw kids shoving the whole pie in their mouths.  this is no special recipe.  it's the one off the label of the pumpkin can!!  the crust i used was one i haven't used for any of my pies before, but it will be now!!  it is pate brisee (patay brizay)  it's an all butter crust.  it is so flaky and tasty.  i do add more sugar than is called for, that is the only way i'll eat the crust.   anyway, i made the pate brisee for a 2 crust pie and rolled it out (the recipe can be found anywhere on the internet).  i then used a 3 inch cookie cutter and cut out my circles.


from there, i put the circle of dough into my muffin tin and pressed very gently down.  then i poured in my filling.  i baked at 450 for 10 minutes then turned it down to 350 and baked for 10 more minutes.  so easy!!  this made 48 mini pumpkin pies.  i did make more of these last night, but a little bit bigger.  i used a 4 inch cookie cutter instead and the crust came up to the top of the muffin cup.  this way, i made 24 mini pumpkin pies.  these are seriously so much fun!!!  at our thanksgiving, we'll have about 4 children under 7 and these are a perfect portion!!

i  am planning to post the pencil skirt later today when we get home from our thanksgiving dinner!!! 
i also wanted to mention a few things i am thankful for:  my home, husband, children and my friends here in lubbock that we get to spend time with today and every day!! i also am thankful for the canadian geese that fly over our apartments at all times of the day during this time of year!! (seriously, i love them) it is such a wonderful sound and sight!! ( i also love that my kids love them too!!!)
have a very wonderfully fantastic thanksgiving!!! see you later today!!

Monday, November 21, 2011

Super Easy Tile Coasters

I found this super easy way of making drink coasters out of tile.
The tile only costs about $.20 each at Home Depot and I had the mod podge already (of course!)
In about 5 minutes I had these beautiful coasters.
I think they will make a great Christmas gift for a few people =)

Here is what you do:


Here is how they turn out!
Seriously these were SO easy! This might be my neighbor gift for Christmas. 
Easy, cheap, and super cute =)

Melissa

Pin It

Saturday, November 19, 2011

the easiest pj pants ever!! seriously...

every year, i get my boys new pjs to open on christmas eve.  i love me some cute boy pjs.  however, they are crazy expensive.  this year we just don't have enough money to spend $20 on new pjs.  soooo, i found the easiest pj tutorial on the internet.  i seriously can't believe how easy it was to make these, about 20-30 minutes per pair.  i, once again, used my gray flat sheet that i have previously used for 2 scarves (one is mia) 2 large gathered pillow cases and now 2 pair of pj pants, and there is still more fabric leftover!!  i turned nicely fitting pj pants inside-out and folded them to get the right size.  when i cut them out, i added about 2 inches to the top for the casing of the elastic, and would have added 2 inches to the bottom of the pants but i used the finished edge of the sheet instead!! one less step to do!! i cut my 2 pattern pieces (one piece for each leg) on the fold, so i only have an inseam, and no seam on the outside of the legs.  i sewed up the inside of the legs to the crotch (inside-out, of course), then lined up the fabric from front to back (belly button to booty crack) and and sewed, i didn't even use pins on these pants!! awww yeeeah!!  i also double stitched everything.  then i cut my elastic to get the right size, folded the top down twice to get the right size for the casing, then sewed around the waist, leaving an opening for the elastic to enter and exit.  i threaded the elastic through with a safety pin, then sewed my elastic together, then sewed the casing closed.  that's it!!  i don't have any pictures, i was trying to go as fast as i could before the baby i babysit woke up!! it worked! i got both done in way less than an hour.  now all i need are shirts to go with them.  walmart has shirts for $2-3.  we are also planning to do some freezer paper stencils on them, though we're not quite sure what we want on them yet.  the boys love them and keep begging for me to just let them have them before christmas because they're sooo comfy!! i love it!!  to see the full tutorioal go here.

                                                                    cherisse
p.s. coming up next week from me is a skirt tutorial, mini pumpkin pies for my sons class, and possibly a giveaway!!!! stay tuned....

Thursday, November 17, 2011

Decorating Nurseries!!
A lot of thought went into my little girl's nursery.
When we first found out it was a girl, the wheels started turning in my head. I was so excited to decorate her nursery ANY WAY I would like!
My first thought was polka dots. We had to do polka dots! My second thought was pink and brown!
I love those two colors together.
I took many trips to hobby lobby to find cute accessories. Then found the perfect crib set.
Everything started to fall into place =)

Finally, when I was about 8 months pregnant I was able to put it all together.
I painted the walls, put together the furniture, added decor, etc...etc.....
Here is how it turned out!
(a few things have been added since)
I can't wait to decorate a nursery for a little boy
(maybe someday....)
Although I wouldn't mind decorating another girl nursery =)

Tuesday, November 15, 2011

easy and casual napkin/place settings for thanksgiving {or whenever!!}

i saw this idea on the katie brown workshop on the create channel.  she did a no sew version.  however, the iron on sticky stuff is more expensive than the thread i already had, so i sewed mine.  it's easy either way.  these seriously took me 5 minutes each, maybe less!!  also, you could use any sturdy material other than denim with equal cuteness, i just happened to have quite a few pair of denim jeans that were in the goodwill pile.  i did not measure how big this denim napkin/place setting was, it's not my way.  i just made sure it was big enough for my knife.  this is how i threw these together:  cut some denim into a square, and sew the edges (seam allowance for how big you want your fray to be).  next, cut a small rectangle for the pocket that holds the silverware.  mine is roughly 3" x4".  sew it onto your denim square. make sure you sew it so the knife doesn't come above the top of the napkin.  you're done!!  you could put them in the dryer for a few minutes to get the frayed look.


i put my napkin/place setting rolled up inside of a mason jar for the following reasons:
i pictured myself hosting thanksgiving (which i'm not) and i thought of doing it buffet style.  how easy would it be for your guests if their drinkware, napkin and utensils were all right there in one place, maybe even with name tags? how easy and thoughtful!! and you won't be worried about wiping your kids thanksgiving faces with a denim napkin!!  i love drinking out of goblets on thanksgiving and such holidays, but i have to face it: i'm really just a casual girl.  a thanksgiving with denim napkins and mason jars full of cider (or pumpkin juice *wink*) would be oh so comforting. don't you think?

Sunday, November 13, 2011

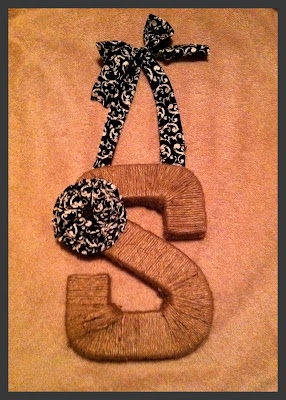
Monogram Twine Wrapped Letter

I've been on a door hanger craze lately. 
3 in just a few weeks!
But this one is SO cute.

You will need:
-a monogram letter
-twine
-fabric
-glue gun

First wrap the monogram letter with the twine. If you want to see a tutorial to how to wrap a monogram letter you can find it HERE

Cute two pieces of fabric to the length you'd like. Then you can either sew the sides together or glue. I glued mine!

Glue the ends to the monogram and tie a bow at the top

Now for the flower:
Cut out 10 large circles (it doesn't have to be a perfect circle)
Cut out 8 smaller circles.
Fold each circle in half then in half again then in half again.
Glue each piece onto a piece of felt.
Adjust each piece to your liking

Glue your flower to your twine wrapped monogram

I made this one for my sister-in-law Laine. I think I'm going to have to make this for myself =)
Melissa


Pin It

Friday, November 11, 2011

pleated scarf!!!

i made this fantabulous scarf earlier in the year.  once again, i had everything i needed.  it was super easy, but  a little bit time consuming. it's sooooo warm and it doesn't make me itchy scratchy. here is the link to the site where i followed the tutorial.  for my scarf i used a leftover navy blue flat jersey sheet that we never put on our oldest sons bed.  i absolutely love the way it turned out!! head on over there and check it out!!  i need to give it a tumble in the dryer. . . it looks a little flat. (it's been in our winter wardrobe box) anyway, tending to this munchkin takes some time away from crafts and cleaning (oh no!! not that!!) but i love it. . . maybe it's time to have another one of my own. . . enjoy the scarf and try one of your own!!!
                                                       cherisse

p.s. coming up from me on tuesday is a fun and casual way to make your own napkins plus utensils at thanksgiving dinner!!!


Pin It

Wednesday, November 9, 2011

Seriously the best potatoes EVER

It was my turn to make dinner this past Sunday for the Sarager's. I came across this potato recipe on pinterest that I wanted to try out. And it was SO STINKIN GOOD. My father-in-law even said it needed to stay on the rotation for dinner once a month! I do not get compliments too often when I good for them so I was THRILLED to actually get good feedback!!! Then my mom tried some the next day and said she devoured them in a matter of minutes, they were THAT good =) I thought I would share this super yummy recipe with you all.

Twice Baked Potato Casserole
  • 5 lb russet potatoes
  • 10 sli bacon
  • 8 oz cream cheese
  • 0.5 c unsalted butter, melted
  • 1 c sour cream
  • 0.25 c chives, minced
  • 2.5 c cheddar cheese, grated
  • 2 t kosher salt
  • 0.5 t pepper
1. Preheat oven to 350 degrees. Peel potatoes, and cut into 1-inch chunks. Place in a large saucepan, and add enough cold water to cover by about 2 inches. Bring to a boil over medium-high heat, and reduce to a simmer. Cook until tender and easily pierced with a paring knife, about 20 minutes. Transfer to a colander to drain; return to pan, cover, and set aside.
2. Meanwhile, heat a large skillet over medium heat. Add bacon, and cook until crisp and browned, turning once. Transfer to paper towels to drain; let cool, and crumble into pieces.
3. Using a fork, mash the potatoes in pan until light and fluffy. Add the cream cheese, butter, and sour cream, and stir until combined and smooth. Add the chives, 2 cups cheddar cheese, half the bacon, salt, and pepper. Stir until well combined.
4. Transfer to a buttered 3-quart baking dish. Top with remaining 1/2 cup cheddar cheese. Bake until top is slightly golden and potatoes are heated through, about 30 minutes. Remove from oven; garnish with remaining bacon. Serve immediately.

I got the recipe HERE

Seriously try it! Everyone will love it!

Melissa

Monday, November 7, 2011

no craft to post....

so. . . . . . . . starting this morning, i am babysitting a very super cute 6 week old baby boy monday through friday school hours until may (his mom is a good friend and teacher at my oldest sons school).  i spent all day yesterday cleaning my house so that it somewhat resembled a home and not a disaster area.  i do have a craft to post. . . . i just can't post it right now.  as soon as i stop staring at and snuggling this handsome baby, i will post it. . . . it's another scarf. so stay tuned!! scarf tutorial coming shortly!!!
                                                                     cherisse

Saturday, November 5, 2011

Crepe Paper Roses

The countdown to my little girl turning TWO has begun!
I have a month to get her birthday party stuff together.
I figured since she doesn't have an opinion yet on what she wants for her birthday party I would have a fancy party for her.
This just might be my last chance to do what I want!
So bring on the lace, purple, crafty, fancy decor!

One of the cute decorations I decided to do was glue crepe paper roses on a foam ball.
I'm not sure what I'm going to do with it yet but I think they're pretty cute. 

Here is what you do.............


I'm thinking I will use them as some kind of centerpiece or hang them from the ceiling.
Either way I think they turned out very cute!
Now I can't wait to work on some more fancy decorations for my sweet baby girl's 2nd birthday.

Melissa


Pin It

Thursday, November 3, 2011

hat fancies!!

last winter, i was at tj maxx, for i don't remember.  a really cute hat caught my eye on my way out.  it doesn't look that great on me, but i love it.  it reminds me of a hat from the 1940's.  it was only $5 so i bought it.  it's kind of plain. at first, i would just wrap a thick black ribbon around it and secure it with a safety pin from the inside.  that got old quick and i wanted to add some color to it.  here is my first hat fancy.  i like it.  i wear yellow a lot.  i just got a new coat that is yellow, so now i can coordinate better (hopefully, i'm not that great at matching clothes and accessories).  i hand sewed eighteen buttons together (i already had them of course).  then i took my gray jersey sheet scraps and cut them into three smallish strips, i'm not sure how long they were, this was kind of on a whim/last minute before i went out.  i braided those smallish strips and threaded them throught the sewn buttons and wrapped them around my hat and tied them in a knot.  i guess i could've sewn the ends together, but i haven't yet.  and that's it!!  i've also worn it as a regular head band.  but i love it on my hat!!  i keep talking about getting more hats, but my husband hates this hat and he says no more hats for me.....we'll see.
                                                                       i also have some peacock feathers that went missing a while ago, but they have been found and are dying to be used for another hat fancy along with a mother of pearl button.  yay!! happy november!!
                                                                        cherisse

Tuesday, November 1, 2011

Glitter Candles

Hope everyone had a fun and Happy Halloween!! We sure did! We took my daughter trick or treating for the first time and had so much fun. Halloween is a lot more fun with kids!

So I have been trying to find ways to change up some decor in my house at a very low cost (preferable none) I have these really plane dull looking candles hanging in my room and I wanted to spice them up =) With a little mod podge and some white glitter I was able to do just that!


I will be doing more glitter candles in the near future! I was think red and green glitter for Christmas! Purple would look nice too. Can you tell I love glitter!

Melissa

Pin It

Sunday, October 30, 2011

scarf!!

i was going to save this for november, but since we are only a couple days away and since i've already worn it quite a few times...it's time to share!!  i saw the inspiration scarf on pinterest.  when i took a closer look, i realized the scarf was crocheted, which is fine, i know how to crochet.  but, i didn't have the right sized hook or the yarn or the money to buy those things, even though they are relatively cheap.  i was soooo sad.  but upon further contemplation, a second realization came to light:  i don't like yarn around my neck, it's itchy. but i do like jersey...which i have plenty of!! i just needed a little bit of quilt batting, not a lot, but just enough to keep me warm, and i could make my own version of this cute scarf!!  thanks to my hoarding all things crafty tendencies, i found everything i needed in one of my many fabric/craft boxes!!  i got to work!

this is the original scarf that i love!!

and here's how i made my version of this scarf:

i grabbed a piece of jersey fabric that was lyin' around.  it was 23" long, 9" wide on one end and 7" wide on the other end. (the bigger end is where the button holes go) i found a piece of leftover quilt batting that was just slightly smaller.  ok, so i did two scarves.  one is blue and one is gray.  the blue one i did with unfinished edges, meaning i sewed the scarf wrong sides together.  i like the way the jersey rolls up around the edges.  the gray one is the opposite, sewn right sides together then turned right side out.  i like the gray one better.  it goes with everything. 


then i pinned my fabric and batting together.  sewed it up good with two rows of stitches.


now it's time for the button holes.  i have a very random assortment of buttons collected by my grandmother (?) possibly my mother and a dead lady that was having a garage sale.  i chose 3 that were similar but not the same and marked their sizes onto my scarf.  i marked top, bottom, and sides so i would know where to do my button holes.
next, i cut open my button holes and slid the buttons through a few times to make sure they fit snugly.
then, i wrapped the scarf around my neck and marked through the button holes with a pen, where my buttons would be sewn. (no picture, sorry)  i sewed on the buttons and there i was, with a new scarf!


and there you have it.  i'm not very good at explaining things...so leave a comment if you need me to clarify anything!!
p.s. i only have 1 more book to go in the soul screamers series...i seriously like.  super fast read, intense and i believe there are two more that haven't come out yet...yes i have a reading addiction.
                                                                            cherisse